)
Figure 1
Once, early in my career, I needed a high resolution version of my company's logo. Any hand drawing of this logo would have been ugly, so I decided to write a small program in Tcl/Tk which drew the image and generated Postscript. This had the advantage of producing an infinitely scalable, mathematically perfect version of the company logo (which happened to be quite regular).
Well, times have changed, but I'm still doing company logos for projects that I'm working on. Now I have a new tool in my belt: the Gimp (www.gimp.org). The Gimp is a powerful, Photoshop-like image manipulation program with a plug-in interface. Unlike Photoshop, this plug-in interface is self-documenting and extensible. Also, the Gimp allows programmers complete control from their favorite language. Mine is Perl, of course, but APIs also exist for Scheme, C, and C++.
As an introduction to the Gimp and its Perl interface, I will go over what you might want to do with the Gimp. If you are familiar with the Gimp, you might want to skip this section. Then I'll discuss where you can get the tools you need, and finally I'll walk you through a simple Gimp/Perl script that generates the logo for my current company (nothing like a shameless plug). This is a very simplistic example, but it has the advantage of being small enough to analyze in depth.
The Gimp (which is an acronym for GNU Image Manipulation Program) was written by Spencer Kimball and Peter Mattis, two graduate students at UC Berkeley. They released the source code for an early version, and since then development has been a whirlwind of effort by hundreds of people writing everything from simple plug-ins to language interfaces to documentation. The graphics toolkit (Gtk+) that was written to handle the Gimp's display (buttons, scroll-bars, and so on) has even become the cornerstone of many other efforts, including GNOME (a desktop user interface system).
So what does it do? The simple explanation is that the Gimp can be thought of as a paint program with several key features:
• Layers. Layers allow you to work on different parts of the image as though they were on separate sheets of transparent plastic. Anyone who has ever cut up a newspaper and pasted portions onto a single sheet of paper for photocopying is familiar with the process: You pull elements from different sources together and combine them.
• Channels. Your image is made up of pixels, and each pixel has several channels. For example, in a typical color image there is one red channel, one green channel, and one blue channel. In the Gimp, you can manipulate each of these channels separately. You can also add other channels, which might be useful for storing information which relates to the image, but is not visual (for instance, a selection shape) Such user-defined layers do not appear in the composite image, but can be saved in certain file formats. You can also break down an image into the alternate cyan, magenta, yellow, and black colorspace for pesky physical processes like printing.
• Alpha Channels. In order for layers to have transparent or translucent parts, there needs to be a separate chunk of data associated with each pixel of a layer that describes how opaque or transparent it is. This is called the alpha channel, and is stored along with the other channels used for holding color information.
• Animation. Using Gimp's layers as as series of frames, you can edit animation such as animated GIFs.
• Scripting. Many programming languages can be used to write extensions for the Gimp including new image effects and filters and scripts that use the Gimp to generate an image of their own (as our example will do).
The Gimp builds on and combines each of these concepts, creating a wealth of tools which can be used to do just about anything to an image, including analysis of an image in alternate colorspaces (for printing); photographic touch-up features including burning and dodging (techniques used in photo developing); and many other advanced features.
For an excellent reference to the Gimp, I direct you to http://www.gimp.org/docs.html, which has a good list of tutorials and manuals. There is also a book, The Artists' Guide to the Gimp, which has a Web page at http://www.thegimp.com/ .
)
The Perl interface to the Gimp is built on top of the standard Gimp C API. It allows you to create new functions and menu entries called plug-ins that are indistinguishable from the standard Gimp menus and functions. When you write a plug-in, you are writing a stand alone program using Gimp libraries. The Gimp executes this program once during start-up to register the plug-in name and to add its menu entry. When that menu entry is selected (or the function is called from another plug-in) the Gimp runs the plug-in again.
For example, if you select the "Xtns" (extensions) menu from the toolbox window and then select the "Render" sub-menu, you will see an "SNS Logo" entry if and only if you have installed the example code from below in your .gimp/plug-ins directory. It will appear as shown in Figure 2.

When the user runs a plug-in, they are presented with a dialog box which lists each of the plug-in's parameters. Fortunately, you don't have to write the code that displays the dialog box; that's all been taken care of for you. You just have to specify the parameter types so that the Gimp knows what sorts of things to ask the user for. To demonstrate plug-ins, you can run the many Script-Fu Logo plug-ins (under "Xtns/Script-Fu/Logos") which all take a text string and render it using an effect (e.g. chrome, neon, or alien glow.) A demonstration of the "Cool Metal" plug-in is shown in Figure 3. Perl opens up many areas to Gimp developers unavailable in other languages. For example, one of the recently contributed Perl plug-ins, image-tile, can render an image by tiling several thousand other images as the parts of the overall picture. This technique is so memory-intensive that the information stored about each image needs to be stored in a Berkeley DB database, which Perl knows how to map to a hash, transparently. This kind of convenience makes writing large, complex plug-ins for the Gimp quite simple, and puts the focus of the programmer back on the effect.
Right now the Gimp only works under Unix. There are porting efforts to other platforms; one X-on-Win32 version does exist, but it doesn't support Perl yet.
The following table lists what versions of what things you need for each version of the Gimp. Check the Web sites listed below for current versions, which might be later than these.
| Package Edge: | Stable: | Development: | Bleeding |
| Gimp | 1.0.4 | 1.1.4 | cvs module (gimp) |
| Glib (c library) | 1.2.1 | 1.2.1(*) | cvs module (glib) |
| Gtk+ (c library) | 1.2.1 | 1.2.1(*) | cvs module (gtk+) |
| Gtk (perl module) | 0.5120 | 0.5120 | cvs module (gnome-perl) |
| Gimp (perl module) | 1.072 | N/A(**) | N/A(**) |
| PDL (optional) | 2.0 | 2.0 | 2.0 |
| Mesa (optional) | 3.0 | 3.0 | 3.0 |
| perl (interpreter) | 5.005 | 5.005 | 5.005 |
| * Glib and Gtk+ are currently undergoing re-structuring for the upcoming 1.3.x development series. For now, use the stable 1.2.x series, or get the source from cvs, as described below. | |||
| **You don't need a separate Gimp Perl module with 1.1.x Gimp or later, as it is now part of the standard distribution. | |||
For the stable series, you should be able to get a pre-compiled version of Gimp from
http://www.gimp.org/download.html
and Gtk+/Glib from
http://www.gtk.org/download.html.The development series is available from the same places, but usually only in source code form.
The Gimp and PDL Perl modules can be downloaded from:
http://www.perl.com/CPAN/modules/by-module
For access to the source, I highly recommend the article (by Zach Beane, the maintainer of the Gimp News site) at:
http://www.xach.com/gimp/tutorials/cvsgimp.html
This describes how you can get the Gimp straight from the source code repository. It will be more unstable (this is where new bugs first appear), but can be worth the extra effort in terms of getting access to the latest features. When reading the above article, add gnome-perl to the list of modules to download and install, by including the step:
cd $PREFIX
cvs -z3 get gnome-perl
cd gnome-perl
perl Makefile.PL PREFIX=$PREFIX
make
make install
Do this after the steps described for downloading the source, compiling Glib and compiling gtk+, but before compiling Gimp.
The 5.004 Perl series may work for Gimp, but there are some features which will not be supported. For example, the "Last Vals" button will not work without Data::Dumper, which is bundled with 5.005.
For all versions, the Gimp module really wants to have both the Perl Data Language (the PDL module; see http://pdl.perl.org), which in turn likes to have Mesa (a 3D/OpenGL library) around. Mesa is supposedly optional for PDL, but I've had problems compiling without it, and it's a very nice library to have around, especially in combination with the xscreensaver program, which can take advantage of it. PDL is quite large by itself, and worthy of a separate article [TPJ #5. -Jon]), but the Gimp uses it to allow efficient manipulation of image data (which would be very slow in Perl if you had to do it pixel-by-pixel). Most of the time, you'll find that you don't need PDL, because many high-level functions already exist to generate the effects that you want. You can find Mesa at:
http://www.mesa3d.org/
The order of installation should be:
Perl
Mesa (optional)
PDL (optional)
Glib
Gtk+ (C library)
Gtk (Perl module)
Gimp (program)
Gimp (Perl module)
A Gimp/Perl plug-in, as mentioned above, is a Perl program. It is called by the Gimp and uses the Gimp API to perform some action. Some plug-ins affect the current image, like the blur filter; others let you type a string and then render it with a special effect, like Cool Metal's chrome. The example in this article is like a logo plug-in, but generates a shape instead of text.
Plug-ins for the Gimp go into your $HOME/.gimp/plug-ins directory. (If you are using Gimp version 1.1, you will need to put things under $HOME/.gimp-1.1/plug-ins.) They need to be made executable: chmod a+x from your Unix prompt. I recommend that you edit them elsewhere and copy them in, as things like backup copies and auto-save files can badly confuse the Gimp.
Before getting into the example, let's discuss a few basic concepts. Your plug-in is either being provided with an image, or (as in this example) you'll be creating one. This image is represented by a Perl scalar variable, and most plug-ins call it $img or $image. When you want to modify an image, you will need a drawable. A drawable is an abstract term that can refer to a layer or any other part of an image that you can draw into. Your plug-in doesn't have to worry about this, it just needs to use the drawable that it was given. Or, if it's creating its own image, the layer that you create. To make this even more convenient, every Gimp/Perl plug-in that operates on an existing image takes the image and drawable as its first two parameters.
There are a few other types to know about when writing plug-ins, but the only one that we will work with here is a color. Colors are manipulated by reference in a three-element array (red, green, and blue), but most often, you simply tell Gimp/Perl that your plug-in needs the user to select a color, and it will be passed to your plug-in. Other types such as layers and channels are similar to the image type. They are opaque data-structures, which you manipulate by reference. (Actually, they're objects, but unless you want to use the object-oriented interface you don't have to worry about that.) Now let's see the Gimp in action. This example in Listing 1 creates a new image, and draws the logo for my company in it. The current foreground and background colors are used, as well as the currently selected paintbrush (check out the Brushes menu option under Dialogs, which is under File from the toolbox window for the available brush styles).
Let's look at what each step of this plug-in does. You need to include and initialize the Gimp modules:
use Gimp qw(:auto);
use Gimp::Fu;
These are the two basic libraries. (The :auto forces inclusion of the entire Gimp Procedural Database as auto-loaded functions.) Don't confuse the Gimp::Fu module, which implements things like the registration interface, with Script-Fu. Script-Fu is the Scheme scripting interface for the Gimp. (Scheme is a programming language derived from LISP.) Gimp::Fu and Script-Fu have nothing to do with each other.
# use Gimp::Util;
Gimp::Util is not strictly necessary, but if you include it, you can use a few extra goodies that it provides. For example, this module provides functions for adding text to an image (usually a multiple-step process) or finding a layer's position in an image. You can use perldoc Gimp::Util for more information. This script does not use these functions, so the line has been commented out.
Most of your plug-in will be a subroutine, whose name can be whatever you like. Since you can register the function under a different name with the Gimp, you can choose any name here. However, be careful to avoid any name which is currently in use in the Gimp's Procedural Database (PDB). Use the DB Browser under the Xtns menu to make sure that your function name is not already in use. If you choose the same name as a PDB function, you will hide the Gimp version of the function from your program.
sub perl_fu_safety_logo {
In this function, you need to receive any arguments that were passed to you, and (as you'll see below) you can tell the Gimp what types of parameters you expect. If your plug-in is for working on an existing image, the first two parameters will always be an image and a drawable. In this case, we are creating our own image, so we expect only the plug-in specific parameters:
sub perl_fu_safety_logo {
   my $width  = shift;
   my $height = shift;
Now, this is where we need to actually start talking to the Gimp. You do this through calls to the PDB. The Perl interface for doing this looks just like normal function calls. Use the DB Browser, as mentioned above, to search the PDB for the function you're looking for. This browser allows you to look at all of the Gimp functions and plug-ins, their arguments and return values, and documentation for each one. In the following examples I won't touch on all of the parameters for every function; you can use the PDB browser to look up anything from the example source code that I skip.
The first thing we want to do is create our new image with the given width and height:
my $img = gimp_image_new($width, $height, RGB);
That's it! You've now got a new image (of type RGB -- full color). Of course, it has nothing in it. That's not quite the same as being blank, which would mean that it has a background and nothing else. This image really has nothing in it. In order to have actual image content in the Gimp, we must add a layer:
my $layer = gimp_layer_new($img, $width, $height,
            RGB_IMAGE, "Safety Logo", 100, NORMAL_MODE);
gimp_image_add_layer($img, $layer, 0);
Notice that the type for this layer is RGB_IMAGE, and not RGB as we used for our image. Also, an opacity must be specified, which tells us how opaque or transparent this layer is (here, we give 100%). NORMAL_MODE refers to the layer combination mode, which is an advanced feature that can be used for some stunning effects.
The third parameter to gimp_image_add_layer() specifies which layer this should be in the image's list of layers. The first layer, layer 0, is the closest to the observer. Each successive layer is farther away from the viewer, and may thus be obscured by layers above it. Here, we'll use only the one layer, to keep things simple.
Now you have to clear out your new layer, because at first it might have random garbage in it. You can do this by using gimp_bucket_fill() to put a background color in it, or by using gimp_edit_clear(). gimp_edit_clear() will have different behavior, depending on whether the layer can have transparent areas (an alpha channel). Here we simply paint our background using gimp_bucket_fill() which could also be used to paint a pattern, if we wished. Note that gimp_drawable_fill() is a new function which should be a little faster and easier, but may not exist in your version of Gimp yet.
my $oldcolor = gimp_palette_get_foreground();
gimp_palette_set_foreground(gimp_palette_get_background());
gimp_selection_all($img);
gimp_bucket_fill($layer, FG_BUCKET_FILL, NORMAL_MODE,
           100,0,0,0,0);
gimp_palette_get_foreground() and
           gimp_palette_set_foreground()
both work on the user-selected foreground and background colors. This is why we save the value: so that it can be restored later. We could have used the BG_BUCKET_FILL parameter, and then none of this would be necessary, but doing it this way lets us demonstrate more features. gimp_selection_all() selects the entire image, and gimp_bucket_fill() fills up the entire selection with the current foreground color. As before, the NORMAL_MODE and 100 arguments are layer mode (paint mode, in this case) and opacity. The last four arguments only matter if there is no selection, and that is not the case, here. So, we've filled the entire layer with the background color, which is a good starting place.
One important thing to note: The second parameter to gimp_bucket_fill() must be a drawable. In this case we pass a layer, which is one kind of drawable. There are other drawables, and you will find them as you work with the Gimp. However, keep in mind that if you write a plug-in which works on an existing image (see the register() function, below) you will be given a drawable, which you can use for calls like gimp_bucket_fill(), but it may not actually be a layer. You should never assume that it is, which is what you're doing if you pass it to a a function like gimp_layer_resize().
gimp_palette_set_foreground($oldcolor);
gimp_selection_none($img);
gimp_paintbrush($layer, 0, [$width/2, $height/18,
          $width/2, $height-$height/18]);
gimp_paintbrush($layer, 0, [$width/18, $height/2,
          $width-$width/18, $height/2]);
Here, we reset the user's foreground color, unset the selection and draw our first two lines. It is possible to select a brush shape for the gimp_paintbrush() function, but we leave this up to the user. Note that the third parameter to gimp_paintbrush() is an anonymous array (the list inside brackets); more on this later.
my $magic = ($width/18*7) / sqrt(2);
gimp_paintbrush($layer, 0,
          [$width/2-$magic, $height/2-$magic,
          $width/2+$magic, $height/2+$magic] );

gimp_paintbrush($layer, 0,
          [$width/2-$magic, $height/2+$magic,
          $width/2+$magic, $height/2-$magic] );
Here, we draw the next lines, diagonally, using a little bit of geometry to figure out where the endpoints of the vertical or horizontal lines would be if we rotated them by 45 degrees.
for (my $i = 0; $i < 4; $i++) {
   gimp_ellipse_select($img, $width/18*(2+$i),
            $height/18*(5+$i), $width/18*(14-$i*2),
            $height/18*(8-$i*2), SELECTION_REPLACE,
            1, 0, 0);
   gimp_edit_stroke($layer);
   gimp_ellipse_select($img, $width/18*(5+$i),
            $height/18*(2+$i), $width/18*(8-$i*2),
            $height/18*(14-$i*2), SELECTION_REPLACE,
            1, 0, 0);
   gimp_edit_stroke($layer);
}
The gimp_ellipse_select() function selects an elliptical region defined by the given x, y, width and height. The SELECTION_REPLACE parameter tells it to replace any existing selection, and the next parameter tells it to use anti-aliasing for smoothing the "stair-stepping" on the edges. gimp_edit_stroke() is like gimp_paintbrush(), but traces the current selection. So the two functions together draw an ellipse.
gimp_selection_none($img);
gimp_displays_flush();
return $img;
These are final steps that should be used to leave the user in a sane state. We unset the selection, flush any pending display draws, and return the image that we created. The Gimp module will display it for us.
Now, comes the most important part: registration. In order for the Gimp to use our plug-in, it must know what it is called and how to execute it. Here is the registration statement:
register("safety_logo", "Render a
         stand alone Safety Net Logo image",
         ("Renders the Safety Net Solutions
         company logo in the "."currently
         selected brush and fg/bg colors."),
         "Aaron Sherman <ajs\@ajs.com>",
         "(c) 1999, Aaron Sherman",
         "1999-03-20", "<Toolbox>
         /Xtns/Render/Safety Logo", "*",
         [
         [PF_INT32, "Width", "Width", 256],
         [PF_INT32, "Height", "Height", 256]
         ],
         \&perl_fu_safety_logo);
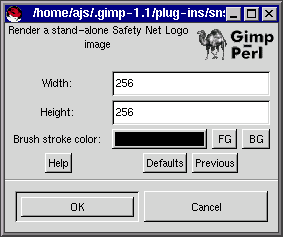
The full documentation can be found in Gimp::Fu, but the basic idea is that the first seven parameters are just strings that set the name of the plug-in, the description, help text, author's name, copyright message, date of last modification, and which menu the plug-in appears in. The menu path is the only interesting parameter. If it begins with <Image>, then it will be placed in the menu that comes up when the user right-clicks in an image. If it begins with <Toolbox>/Xtns, then it will show up under the Xtns menu in the main Gimp window. You can also use the menu <None> to tell the Gimp not to display your plug-in as a menu option. You might do this if you were writing a function meant to be used only by other plug-ins.
The eighth parameter describes the image types that this plug-in can work on. In our case, * makes sense because there is no input image, only an output.
The next parameter specifies the list of parameters to the plug-in. It is a list of lists, using anonymous arrays. Each of the inner anonymous arrays contains the description of a single expected parameter. The description is made up of at least four values: the type, name, description, and default value. As an example, let's say you added the following item to the end of the list of plug-in parameters:
[PF_COLOR, "Brush stroke color", "Color", [0,0,0]]
)
The Gimp module then displays a dialog box like the one in Figure 4. Notice the black button -- [0, 0, 0] is black in RGB notation. If the user clicks on the button they get a nice color-selection dialog for choosing a new brush color Figure 5. The parameter types are all defined in the PARAMETER TYPES section of the Gimp::Fu documentation. The only remaining argument to register() is a reference to your new function.
Plug-ins in the <Image> menu will be available under the pop-up menu that appears when you click the right mouse button in an image. They will automatically get the image and drawable to work on as their first two parameters, so don't list these parameters yourself. Plug-ins such as ours that live in the <Toolbox> menu aren't associated with any particular image, although you can declare one or more image parameters that allow the user to select from any currently open image. The last parameter to register() is a reference to the function that actually implements the plug-in.
The last thing that your plug-in should do is exit with the status returned from the main function, like so:
exit main;
This closes the loop with the Perl::Fu interface, allowing it to take over. The Gimp can then tell it which of several ways it is being asked to behave. You don't have to worry about any of this; just call main. And be sure not to define a subroutine in your plug-in called main, or you'll be sorry. Here's the finished product:
Some notes to help you in your budding career as a plug-in author:
• There is a mailing list for discussion about Gimp-Perl. To subscribe, send mail with the single line:
subscribe
• You can be notified of new versions. Send mail with the single line:
subscribe notify-gimp
• Please upload anything you think would be useful to others to the Gimp Plug-In Registry: http://registry.gimp.org/.
• In the example above, gimp_paintbrush() demonstrated a very useful feature of the Perl Gimp module. If you look in the PDB documentation for gimp_paintbrush(), you will see that the third parameter is a number of stroke coordinates, and the fourth parameter is the array of stroke coordinates. In Perl, we only have to give an array reference, and the module will calculate its length for us. So wherever you see a function that needs a count followed by an array, just pass the array.
• Fonts are the most evil thing ever, because (like X) the Gimp failed to abstract them sufficiently. As a result, you have to force the user to select a font and size, even though the font selection box already includes a size parameter. This is because some font names (such as scalable fonts from a TrueType font server) don't include size information, and the Gimp only tracks fonts by their full XFont name. I've started using the convention that if the user enters a size of < 1, I use the font-provided size, but that's a kludge around a broken feature.
• You will really want to study other sources of Gimp user info (see www.gimp.org) and find out more about the following topics: feathering, alpha layers, and channels.
• For the menu path, don't put your plug-ins under Script-Fu, and don't invent new
menus if you can help it. Put them in with the other plug-ins that are written in C (e.g <Image>/Filters/section/plug-in
or
• Read the Gimp-Perl documentation. You can use your plug-in stand lone, or talk across the network to a Gimp process. You can even debug plug-ins using the Perl debugger, which is almost impossible with some of the other plug-in interfaces.
• Gimp 1.0 and 1.1 differ in that some functions no longer take an image as their first parameter. Gimp-Perl gets around this by allowing you to leave out the image parameter in the older Gimps, but you may have to patch your 1.0 scripts to make them work with 1.1, or eventually 1.2.
• If you write two or more related plug-ins, they can go in the same file. You just need to have one register() statement per plug-in.
• If you want to know what's going on inside your plug-in, try using Gimp::set_trace(TRACE_ALL). This spews a lot of information, but lets you see everything that's going on.
• When you look at the PDB documentation, you'll see that all of the functions have dashes in their names. So that you can call these as Perl functions, the Gimp module converts all PDB names to use underscores instead of dashes. It will also do the reverse to your plug-in's name (as declared in the register() statement) so that other Gimp plug-ins can use the standard Gimp naming conventions. This means that you should name your plug-ins with underscores, not dashes (e.g. my_plug_in, not my-plug-in). Good luck, and happy Gimping!
__END__
Aaron Sherman (ajs@ajs.com) has been programming in Perl since version 3, and using the Gimp since the 0.99's. He is the author of the image-tile plug-in and the File::Copy module that comes with Perl
)
)
)